Tuesday, March 30, 2010

Unfinished Projects

Confession time.
I have a few unfinished projects.
And this is the biggest, most unfinished one.

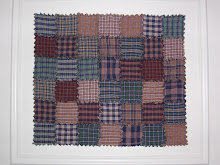
I first purchased yards and yards of red and blue flannels probably 5 years ago. I wanted to make a nice snuggly quilt for my hubby. And, somehow, I wanted it to be a surprise.

I had no pattern in mind and was making this up as I went.
So, it took a while to actually start. I started by cutting squares. Lots of squares.

Then I decided to add some regular cotton fabric in between the squares to help square up the flimsy flannel. Enter the creamy, brown paisley. Sewing the top together didn't take too long once I started. In the meantime, I had made another flannel quilt and quilted it on my machine and didn't like how that had gone. The flannel had a mind of its own and there was lots of frustrated unpicking. So, I decided to hand quilt it.

Hand quilting's nicer, anyway, right? More time, sacrifice, and love involved, right?

I couldn't hide the surprise anymore because my hubby was going to see it on the frames. So I gave him an unfinished quilt top one year for Valentine's day. Two years ago.

It's still on the frames, leaning against the wall in the sunroom. On those rare days when I get out there to work on it, I have to dust it off. Pretty pathetic.
OK--I know I'm not the only one. Please tell me about your biggest unfinished project.


Monday, March 29, 2010

Show and Tell

This is a REAL quilt. (As opposed to a virtual quilt?) This quilt was made by my husband's grandmother probably in the 70's. This was made before quilting became "the thing." She made a quilt for each of her grandchildren. This was made out of scraps, without a rotary cutter, without an Olfa self-healing mat, and without a pattern.


She backed it with snuggly soft flannel and rolled the flannel to the front for the binding.

She handquilted every seam.


This is the most comfortable quilt in the house and the most loved. That's why this quilt stays in its protective cabinet and the children aren't allowed to use it. :) It's a priceless treasure.

Monday, March 22, 2010

Show and Tell


This quilt top stopped at my house on its way to the quilter. My sister-in-law made it and it is so beautiful I had to share! It's a combination of applique and piecing. The detail is amazing and the colors are perfect for spring! I really love it!
It's a twin size and it's going on the extra bed in her little girl's room.
Thanks for sharing!

Wednesday, March 17, 2010

C8's Quilt: Changing Horses

As a teenager, I lived for a few years with my grandparents. My Grandpa D loved to throw out sayings and cliches that he'd grown attached to. We'd always hear one of his favorites during Yahtzee games. Example: I'd roll a 1,2,4,5,6 and decide to go for a small straight. I'd throw the 1 and 2 back in to try and get a 3. The roll would produce two 5's and so I'd change my mind and go for 5's. When something like this happened, we could always count on Grandpa to caution us, "Don't change your horses in midstream." And he would always say it in kind of a "you're going to be sorry" voice. Maybe he was trying to teach us to stick to something, but sometimes you don't know how things are going to go until after you get it started.

This week I finished about 1/4 of the blocks for Cait's quilt. And I'm realizing that I don't like one of the dark greens and two of the dark blues. They're a great color but are too dark and stand out too much. So, I'm glad there was extra fabric and I'm going to cut some more of the lighter colors to make up for it. Yes, it's more work and yes, it'll slow me down a bit, and yes, it might get messy, but in the long run, it's a good choice.

I'm changing my horses for the better. Sorry, Grandpa.

Monday, March 15, 2010

Show and Tell


This beautiful quilt was made by my co-worker. It's her 4th quilt and she's a pro already! It's a lap size and the pattern she used is "Lasagna Quilt" by Terry Atkinson. It's a basic strip-quilting pattern. The strips are sewn together, off-set, and then the center block is surrounded with a border of more strips. I LOVE all of the bright colors and busy fabrics that she used. It's fun and happy! She backed it with velour which I really love! It's a great weight and makes it snuggly soft on the back. She quilted it on her sewing machine by stitching in the ditch in all of the long seams.

She made this for her grandmother who is 90 years old. A quilt is one of the most treasured gifts there is. Everytime her grandmother uses this quilt, she will be surrounded with the love of her granddaughter.

Thursday, March 11, 2010

To Wash or Not To Wash, That is the Question


Yes, that is my 20 year-old Kenmore washer. Still going strong! Fashioned with a Roswell, NM, alien magnet. Very chic in the laundry room.

So, the question is, "Should I wash my fabric before I use it?" There is no right or wrong answer to this question. I think I'll just put some information out there --things I've heard or read about-- and you can make up your own mind.

  • If you are using red fabric you should prewash with a cup of vinegar to set the color. Just in case. Even humidity can make it bleed.
  • You should always prewash your fabric but don't use detergent because it will wash out the sizing.
  • You should always prewash with detergent to wash out the sizing.
  • If you do wash it with detergent, press your fabric with spray starch to put sizing back onto it.
  • Always wash flannels or anything that will shrink. Actually, wash flannels twice--and buy more than the pattern asks for. It shrinks a lot.
  • Wash your fabric if it will be in a quilt that will need to be washed. Mostly baby quilts and quilts used by kids.
  • Wash your fabric if it has a looser weave. This will tighten it up (shrink it a bit).
  • All of the cutters in the quilt shops say that you don't have to wash your fabric anymore. The "good stuff" won't shrink and the colors are set.

So, what's the answer? You tell me.

Thursday, March 4, 2010

On the Bias

This posting has been a long time in the making! Whew! It's finally done! You will notice that the fabric changes from green to purple and then back to green in the pictures. There's a story behind that--I originally did that section of the instructions in a video. I thought it would be much easier to "show" how to do that part than to "tell." Anyway, the video would not upload. Not on this computer, not on my husbands. I tried 100 different things, still no go. So, I went and bought some purple fabric (one day I will make a purple quilt) to re-do the movie. Certainly, it was something I did! The movie STILL wouldn't upload. But, this time, I also took pictures, just in case. So, you get to see the still pictures and hopefully, my explanations are good enough. As always, ask questions if you need clarification!

This posting is a how-to on making bias strips for binding a quilt. Bias strips can come in handy for binding a quilt and also if you are appliqueing vines or other strippy things that can curve. It is a must to use if the border of your quilt has curves or even rounded corners. Bias is fabric cut on the diagonal from the weave of the fabric. This gives the fabric a tiny bit of stretch, which can make it easier to manage, go around curves, and lay flat better.

First of all take one yard of fabric and press out the creases. Lay it on your cutting board right side down.

Next, fold the fabric so that the bottom edge meets the side edge. This turns your fabric into a sort-of traingle. Turn your fabric so that the folded edge is at the bottom of your mat, closest to you.

Then fold the fabric over two or three times so that it's a manageable width, keeping the folded edge even and at the bottom, nearest you. When I say manageable width, it should all fit under the length of your ruler.

The first cut you make will be along the folded edge. I make my bias 2 1/2" wide so the first strip that I cut on the fold is 1 1/4" wide. When that piece is unfolded it will measure 2 1/2" wide.


Cut 2 1/2" wide strips up the entire piece of fabric until you get to pieces so small they'd only be good for your scrap pile.

Next, you're going to take all of your strips and cut the ends into a 45 degree angle. Start by taking 4 or 5 strips and stacking them on top of each other, ends together. Some of the strips will be shorter than others or angles will be different. Match up the ends as close as you can. Make sure you stack each fabric with right sides up.
Find the 45 degree line on your ruler. Line this up with the bottom of your strips. Make sure that the ends of the strips (the underneath ones, too) will all get the same cut.
Make the cut, but don't move your ruler when you're done. Just slide it over a bit. Try and keep the angle of it in the same spot. Now, take the strips out from underneath the ruler, keep them right sides up, and turn them around so the other ends are in front of you. (this is where a video would be helpful--sorry). If you take both ends of the strips and turn them like a steering wheel, does that visual help?

Now, line up those ends of the strips. Make sure they're all together. You might need to scoot down some of the shorter pieces so all the ends are together. All of the ends will need to be cut to the same 45 degree angle.
Slide the ruler back over this end of the strips. Make sure the angle of the ruler has not changed. Put the 45 degree line at the bottom of the strips and make the cut.

If the ends of all of the strips are cut with the same angle, you will be able to sew them together without worrying if the angles will match up. Because they will.

Now it's time to sew all of those strips together. Use a 5/8" seam allowance. Notice the overhang when the strips meet up.


Make sure that your needle goes in where the two strips meet and the edge is along your 5/8" marking.


After all of your strips are sewn together, press the seams open.


Along one edge, press a 1/4" hem. This will be your starting end when sewing the binding onto your quilt. Press the entire strip in half, lengthwise. For the how-to on sewing binding onto your quilt, click here.

If you want, snip off the stragglers.

Roll your binding up so it's manageable to work with. One yard of fabric makes over 14 yards (500"+) of 2 1/2" wide bias. This is enough to bind a King-size quilt. PLENTY!


You do NOT have to use fabric cut on the bias to bind your quilt if the sides and corners are straight. Yes, it does look better and is easier to manage, but it is not necessary. If the perfect fabric for your binding is already cut on the weave of the fabric and you can't or don't want to buy more, then use what you have.

Tuesday, March 2, 2010

C8's Quilt: Cut It Out!

I think that for most people who sew, cutting out is the worst part of any project. Boring and tedious are two words that come to mind. When I was 11 or 12 I was part of a 4H sewing club. We were making a clothing item for the fair. My project was a denim jumper and I wanted to begin with sewing the jumper together. I wanted to get right to it! As our leader began to explain the cutting out process, preparing the fabric, making sure the pattern was laid out correctly, pins going the right direction, which size to cut, transferring markings, etc., I was overwhelmed with how much I had to do before I could even get to the machine. I think our leader saw the disappointment and let us all know that her favorite part of sewing was cutting the item out. "What? How can that be your favorite part??" We were astonished! She said that she loved going over the directions, the pattern, making sure everything was just right. She enjoyed laying that foundation in just the right way so the rest of the project could go as smoothly as possible. Since that little chat (which has stayed with me a long time), I have tried to look at the cutting out process as important and worthy of my time. It's important to do it right, use the right tools to make it go smoothly and double check measurements. It's a good start to making the rest of the project go smooth and turn out right.

Here are some pictures of cutting out C8's quilt.

First I needed to iron the fabric. Not all fabric gets ironed before I cut it, but most of this fabric had been sitting in my stash for a while and the creases needed to come out. (Kindly ignore the messy bathroom counter. Yes, I'd rather sew than clean.) I laid one fat quarter on the board, used a little steam, pressed it, and laid the next one right on top. It saves a little time and gives the underneath ones a little more pressing.
Here's my cutting board, ruler, and rotary cutter (also called my roller blade). I'm right handed so the ruler's to my left and my right hand manages the blade. I've also gotten a little ambidextrous when things are lined up opposite and I don't want to rearrange. Sometimes I flip the entire cutting board around or walk to the other side of the table if I need to. Whatever works!

A few things to remember--Use a sharp blade. When one gets dull or starts skipping, trade it out for a new one. Write a "P" on the side of the old blade-- It's now your blade to cut paper with.

Also, cut through a few layers at a time. I once taught a class on making Christmas Tree Skirts and there was a lady, an experienced seamstress, who was cutting each fabric individually, one by one. No one had told her that you can pile them up, fold them over and cut through them quicker!

One more tip--use the grid on your mat to square your fabric up, but use the lines on your ruler to measure. And, if possible, use the same ruler for your entire project. If some pieces get off an 1/8 of an inch here and there, it could definitely add up when all those pieces are joined together.

When I was done cutting out, I put all the pieces in ziploc bags (best invention ever!) to keep them organized! Ziploc bags kept me sane the two summers I was sewing 50 drill team uniforms!

Out of 40 fat quarters--20 green and 20 blue, I had more than half the fabric left over. I realize that the pattern needed that many different kinds of fabric to look scrappy, but I don't like leftovers. I'll try to use as many as I can in the border and binding.
Now comes the fun part--ready to sew!