Saturday, February 27, 2010

C8's Quilt-- I Love Fabric

When it comes to putting a quilt top together, fabric selection can be tricky and a little intimidating. I don't think you want to spend hours and hours working on a quilt that you end up not liking. And there aren't any specific rules to follow--it basically comes down to what catches your eye.

I'm glad that C8 wanted a quilt of blues and greens. She got to choose and I only had to focus on those two colors. For the pattern she chose, I needed to purchase 20 fat quarters of blues and 20 of greens. Since there were going to be so many different, random fabrics involved, I decided to go with fabrics that didn't have any white in them. This would help it to look less scrappy.

This is a fabric I chose for the back. There was only 5 3/4 yds left on the bolt so I got it all. I might use this in the border on the front but I haven't decided yet. It's an awesome strong print and the colors are perfect.


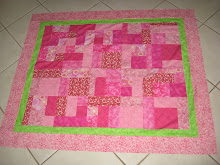
The wrench that C8 threw in last week was she wanted a bit of pink in the quilt. So, I went out and bought some pink. I'm guessing maybe pink is on its way out, I'm not sure, but there wasn't as much pink in the store as usual. The only pink I found that would work had a little bit of white in it. I thought it through and decided it would work because the pink is only going to be used in the center squares and in the inner border. It won't be sharing time or space with the blues and greens.

Sometimes I wish that there were a list of rules for choosing fabric. But, there's not. Of course.
There are a few tips that can be helpful, however.

First, trust your own style and what you like. Choose colors and patterns that please your eye.

Next, choose one fabric that you love and then find others that go with it. I've heard some quilt teachers that say not to do that because you might get hung up on that one fabric and have a hard time pairing it with something else. But, whatever you choose, there will probably be one fabric that really catches your eye and you'll want it in your quilt. Be prepared to abandon the love fabric if it's not working for you.

After you have your love fabric, pick colors out of it that you can find in other fabrics. I have a friend that makes the most beautiful quilts and totally ignores this tip. Her fabrics don't have anything in common color-wise except they're bright and busy. It's her style and it works for her. She does follow the tip about pattern size and I think that's what makes it work for her.

The tip about pattern size--This is a basic designer's tip that's used in everything from landscaping to rearranging furniture. Large, medium, and small. Have a fabric that contains a large print, have one that contains a medium print, and another with a small print. Try to find patterns/colors that are opposite in some way so they compliment each other. One thing that I always put in my quilts is a stripe or check. I don't know if that's a real tip or just me, but I always make sure that one of my fabrics has lines. Here are some of the greens from C8's quilt.

Another thing to keep in mind with color is how the other fabrics make them look. Do you see how that second fabric up looks yellow next to the other greens? I'm keeping it though because there are other yellow-greens in the quilt and I like the large print.

I think that the most important thing to remember when selecting fabric is to make sure you like it. Every quilt is different and it's OK to take a risk. Try a fabric with texture. Ask other people's opinions but remember that their opinion is just another option. Get ideas from looking through quilting books, up close at the fabric in the pictures.

I feel like I lucked out with C8's quilt. Since the quilt is for her, she chose the colors and gets to live with it. Not too much thinking required on my part.

But when I went to find the pink fabric, I found some other fabric that got me thinking about J's Eagle Scout Quilt. I definitely found a love fabric for that, too. More on that later.

Wednesday, February 24, 2010

C8's Quilt: Graduation Traditions

They say that you have to have three of something in order to call it a collection. Three antique watering cans--it's a collection. Three Beanie Babies--it's a collection. Three mini schnauzers--it's a collection.
So, how many times do you have to do something in order for it to be a tradition? I would say only once as long as it sticks. A few years ago on Valentine's Day, we had lobster. We had "do-it-yourself" lobster. It was really good, except for the fact that one of the kids named them all and then got upset when we put them in the pot of boiling water. The 'lobster on Valentine's Day tradition' didn't stick. The next year we had fondue on Valentine's Day and it stuck. We look forward to this tradition every year now. It's fun, unique, and the kids don't get upset because we aren't eating any pets.

Two years ago, when our oldest child, BJ, graduated from High School, I made her a t-shirt quilt. She had stacks and stacks of t-shirts and it was hard for her to choose because they all had good memories and hard for me to choose because of quality of the shirt, color, and size of the design. We ended up using over 30 t-shirts and it was a HUGE quilt--almost King size. Plenty big for a dorm bed. But she loves it and that's good enough for me!
Now, C8 is getting ready to graduate. I asked her if she wanted a t-shirt quilt. She said no. (Scratch the t-shirt quilt tradition.) Instead, she wanted a regular quilt made of blues and greens and maybe some pink thrown in there. Full size. This pattern, please.


New tradition--Making a quilt for the graduating senior with their choice of pattern/size/fabric.

Looking ahead, in two more years, we'll have a collection.

Monday, February 22, 2010

14th Annual Interfaith Charity Quilting Bee

Last Saturday was our Annual Quilting Bee. Our church has hosted this event for the last 14 years. It is an incredible, huge undertaking. It includes 2 1/2 hours of quilting, a luncheon, and a presentation of quilts.

Over 20 different quilting groups and congregations of all different faiths come together to quilt and strengthen the community. Although this is a one-day event, all of the groups have been working on quilts to donate throughout the year.

The gym is set up with over 20 quilting frames. When a quilt is done, it is checked in, counted, and tagged.

Then all of the quilts are laid out over the backs of all the pews in the chapel. Over 200 quilts were donated this year. All of the quilts go to families who are working with the NAM organization to try and get back on their feet. Each member of the family gets to choose their own quilt. For some of the children in these families, it is the first thing they ever get that is their very own.

At the end of the day, all of the quilts are presented to NAM. The presentation usually includes a family who receives their quilts that day and get to be the first to choose. It's fun to see which ones they'll pick. It feels good to make a difference in a family's life.

Sunday, February 21, 2010

Eye Candy

Here are some favorites from Fall 2009's International Quilt Festival. Enjoy the show. They are amazing!
The detail in this first one is unbelievable! Three quilts inside of another quilt! The color of skin! Three people and three pets! Furniture! Flowers! Not to mention the story it tells! Definitely a favorite!

This puzzle blew my mind! The pieces falling out of it at the bottom actually match up to the spaces in the top of the quilt! The quilting was all done in puzzle shapes.

So many pieces! Love the border and the light/dark!


For being so monotone, this one is absolutely striking and beautiful!

LOVE this border! The amount of foliage in the border makes the blocks look fuller and compliments them beautifully. I'm glad the creator didn't skimp on the vine.


I've done a few log cabins but nothing like this! I love the wave in it and the picket fence border on two sides. (Can you tell I love the whimsical category?)


I love old cars so of course I would love this one. What character!


It hurts my head to imagine all of the pieces and planning that went into this one.


Wow. Is Andy Warhol quilting now?


This one tells a unique tale of painting on fall. But I also love the skin tones. The arms looked like photographs--very well done!


This contained about a billion hexagon pieces. Amazing!

My overall favorite. This one has a Dutch flavor to it. I lived in Holland for a year as a teenager so I might be just a little biased.


Friday, February 19, 2010

Bound with Love

This is a tutorial on "how to bind a quilt." I'm sure there are many ways to do this--but this is how I do it.

This red quilt is one of my favorites. I made the top at a quilting seminar in Monterrey Mexico, put on by the Monterrey Quilter's Guild. I'm embarrassed to say that the top was finished a few years ago and the quilting and binding was finally done this past week. Yes, (confession time) I'm human and somewhat of a procrastinator.

Let's start: I laid the quilt out on top of my bed. It measures 86 X 68--an average twin size.

I trimmed the extra batting and backing from around the quilt. Don't worry--I didn't cut the quilt on the bed but even if I would have it would have been OK. The quilt that's on my bed is ugly and was made in China or India or somewhere. The dentist's kids teeth are always rotten and the quilter's bed always has an old raggedy, foreign-made quilt on it.
The bias strips are ready to go--including a pressed hem (not stitched) on the starting end. If you were to unfold this strip vertically, you would see the pressing goes all along the edge. (We'll have a tutorial on making bias strips in the near future.)


In this picture, I've laid out the strip on the edge of the quilt so you can see how the selvage edges meet up. The folded edge of the strip is closest to the center of the quilt. You will start stitching the binding about 6 inches down from the diagonal pressed edge. Just leave the top 6 inches loose for now.


In this picture it shows that I'm starting to stitch the binding to the quilt. Stitch the binding to the top of the quilt. It will be folded over and tacked down on the back. Sometimes when you're sewing on the binding you get a little slack on the top of the binding strip. Try to keep pulling the front and back evenly as you go, but if you still get some slack, it's OK to catch a little wrinkle in the top layer of the strip as you go. After all, it will be hidden in the inside of the binding when you're done.

This is the part that makes people nervous--the dreaded corner!!! Don't worry--it's not that hard, I promise! Pull out and dust off your sewing gauge. C'mon I know you have one! It's one of those notions that comes standard in every sewing kit and you always wonder what you do with it. Use it to measure 1/4 inch in from the corner. Easy so far!


Now mark it with a pencil. Pencil's OK to use on a quilt. You can use a fancy disappearing ink pen, but a pencil works just fine--no one will see it.

I like to stick a pin into the pencil spot, perpendicular to the stitching so if I run over it, it's not a big deal for my needle. The pin is only marking your stopping place. Put the binding strip back down with the head of the pin sticking out so you can see it. Stitch slow, it's not a race. When your needle gets to the spot where the pin goes in, stop and back stitch 2 or 3 stitches, pull the pin out and then remove the quilt from under the sewing machine. Clip your threads. This is not continuous sewing--this is done a side at a time.
The place where you have stopped sewing is going to be named point A. Place your sewing gauge at point A and measure horizontally to the edge of the binding. Slide the orange place-keeper (I'm sure this has an official name--don't know what it is) to the fold of the binding strip to measure the width from the stitching to the edge.

Now turn your gauge vertically with the edge of the gauge at point A. Your orange slider should still be in place from the last picture. Where your orange slider ends up is officially point B. Make sure it's 1/4 inch in from the selvage edge--right in line with your previous stitching. You all with me so far?

Now mark that spot with your pencil. Just a little dot will do.
Put a pin into point B, pushing it about halfway through so it will stay. You can skip the pencil marking of point B and just put a pin in place then--no problem.

Lift up the strip with the pin in it and put point B directly over point A. Push the pin through point A, joining the two points together. The pin only goes through the strip at point B--at point A it goes through the quilt only. I hope that clarifies and doesn't confuse (look at the picture).

Now, the easiest part yet! With the pin in place, turn the strip so it's ready to be sewn down the next side. Make sure that none of the binding strip is sneaking in underneath. Do NOT worry if your diagonal lines don't look straight and even. The most important thing is lining up point A and B so that the diagonal line will look straight after it's done.

Put your sewing machine needle into the exact same place where your pin was. Now you're ready to sew the next side. See, not hard at all. Notice that the fabric in the corner hangs over the edge a bit--that means you did it right. Don't try to line that up or you won't have enough fabric to fold it over later. You will do all four corners the same with finding point A and B, then joining them and continuing down the next side.

When you have sewn all four sides and all four corners you're going to need to know how to end it. Yes, you're almost ready to end it! You're coming up on the end of your binding strip that you kept loose. You need to tuck the strip you're working with inside the loose strip where you started. Just straighten it out with your fingers and line it up as best as you can--pin it in place if you need to. Trim the inner piece's end a bit so there's only a couple of inches inside. (Don't trim it too short--watch the short side of the diagonal!) Then just sew through all four layers to attach it to the quilt all at once. You're done with the machine part!

I always tack my binding strip to the back by hand. I could probably do it on my machine but I can hide it better if I do it by hand. And it gives me something to keep my hands busy with while I watch TV. This is what the corner looks like before it's turned to the back to be tacked down.

Fold one side of the binding strip to the back of the quilt. Stick a pin in it to hold it in place. Then fold over the adjoining side to the back of the quilt. This will make your mitered diagonal line on the back and the front of the quilt. Check it out--cool, huh?


It's ready to be hand-stitched now. I usually pin only the corners down before I start-- just to hold them in place. And I'm sure you can notice that this corner isn't lined up perfectly. I should've taken the pin out and slid it over a bit before I took the picture. It was fixed before I stitched--promise!

When I hand-stitch binding, I hide all of my knots in the seam allowance (the space between the stitches and the edge). I use doubled thread, for strength, and tie a knot in the end. I start by putting the needle through the back of the seam allowance and pull it through to the yellow (quilt back) right where the stitches are. The knot ends up on the inside, underneath the seam allowance. I put the needle through a little bit of the red--along the fold and then run it through a little bit of the yellow--just inside (quilt side) the stitching and then run it back through a bit of the red--in the fold. Also I usually run a few stitches and then pull them tight, then run a few, then pull them tight. Don't make your thread too long or it will get tangled up easier.
Ready for the reveal? This is the quilt finished. Ready for the bed! (p.s. You do not need to tack down the diagonal starting/stopping point. It's fine left as is.) Sheesh, the top corner doesn't even look perfect--I should have folded that one better--or taken a picture of a different corner.