Tuesday, August 24, 2010

I Need a New Pin Quilt!

This is a pin quilt. My OLD pin quilt. I've had it for many years and whenever we travel and have the opportunity, we pick up a souvenir pin. It's our thing.
We have pins from Georgia, Texas, New Mexico, New York, California, Disney, Japan, Chile, Peru, Switzerland, Houston Astro's, 2002 Olympics, quilt shows, museums, cub scouts, presidential libraries, and many state parks as well. This last summer, our pin quilt got full. Too full. We had picked up lots of new pins from Glenn Canyon Dam, Salt Lake City, Hole in the Rock, and Disney World. There were 22 pins in the border alone! Time for a NEW pin quilt.

I'd like to show you a great way to make lots of little squares. You can use this method for a pin quilt or any project that needs a lot of little squares.
I learned this from a friend who I think saw it on a Quilt show. So, this method has been around--nothing new. It will give you 2" finished squares.
First, I cut lots of different reds 5" square.
I want my NEW pin quilt to be 10 X 10 squares. (The old one was 8 X 12.)
This means I need 25 - 5" squares but I cut a few extra, because I like a few extra, just in case, and I will need an even number anyway.

Now that I have you all totally confused, let's get simple. Cut some 5" squares.
Pair up your squares. Since I like random, I pair them up randomly. You might want to have only two fabrics and pair them up one of each.


With right sides together, sew two opposite sides with a 1/4" seam. This will make a tube.


Put these double-squares on your cutting mat, seams on the sides. Then with your ruler, find the middle of your square (2 1/2" over) and cut through the middle.


Now you have two half-double-squares. But that sounds confusing again. Let's go back to being simple, because this really is simple and hard to mess up. Promise.


Open up your two half-double-squares and look! You have a square with two different fabrics! Halfway there!
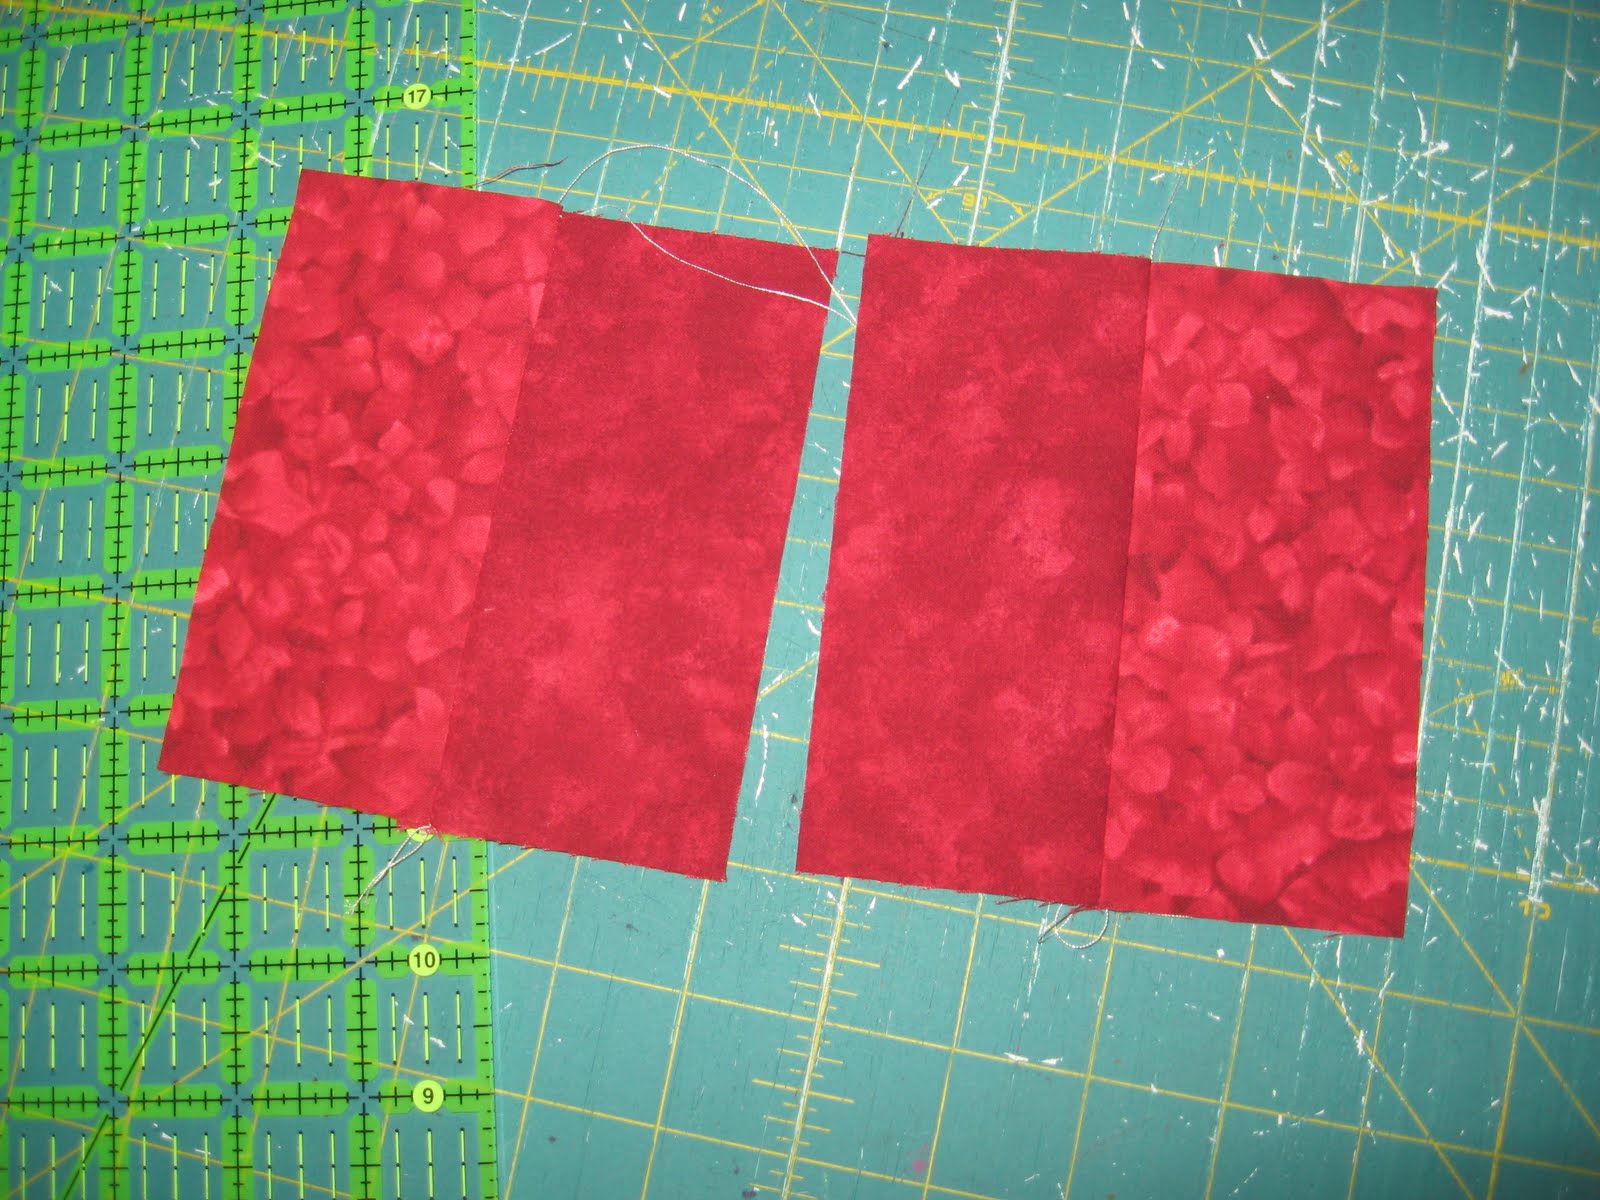
Press those seams and put those squares (or mix them up with other half-squares) back together again, right sides together, seams together, across the middle, horizontally.


Now sew your sides again, 1/4" seam again, and create that tube again.

And now, measure it down the middle again (2 1/2" over again) and cut it in half again.

Now open that up and look at your cute little 4-patch. Perfect 2" squares.

You can mix up your fabrics, if you're using a variety. You get all of these great 4-patches that you can rearrange to find just the right spot for.


That's another reason why I like to do a few extra, so the same two don't end up next to each other.


Sew them all together. 10 squares by 10 squares or 5 blocks X 5 blocks.


Quilt it, bind it, put some pins on it and hang it up!

Then get traveling! :)

(p.s. Try different sizes: for 1" finished squares, start with 3" squares)

Friday, July 16, 2010

C8's Quilt--Adding More Borders--Might as well!

Here are a few pictures of the finished border. C8 wanted more piecing in the border and so I used the scraps and this is what I came up with.

I wanted the wider border to add to the overall size of the quilt, but I thought it looked a little bit odd to go from 1 1/2" strips in the blocks to 4" strips in the border. So I added that middle border strip made from leftover scraps from the blocks. I think it ties the blocks to the border a little bit more.

It is a totally random pattern with regard to the blues and greens and what fabric is next to what fabric. I mostly like the way pure randomness turns out.

I added the strips exactly how I added the pink strip. I measured the width of the quilt and cut my strips that size and then added them. Then I measured the length and cut my strips that size and added them.
Here's a picture of the entire quilt top, finally finished and ready for the quilter. Finished size turned out to be 68" X 84".

I'm upset with myself that I didn't take any photos of the back of the quilt. That would have been a great post/tutorial. I'll take some pictures when I get it back from the quilter! I have a feeling I'll be tacking down the binding on the airplane on our way to Idaho when I take her to college. :)

Monday, July 12, 2010

C8's Quilt--Border Patrol

This is it! All of the blocks are done! 48 blocks that have been tweaked, squared, and stitched together! Time to put on the border! I decided to put on a pink border first to bring out the pink squares in the middle and separate the blocks from the rest of the border.

First step is to measure the short side, right across the middle of the quilt. This tile floor is the biggest space I have in my house to lay out a quilt. And my knees are starting to feel it. Ouch!

It measures 51 1/4" wide. That's the measurement I use to cut the top and bottom pink strips.
I go with a 3" wide strip and cut 2 strips 51 1/4" long.

I find the middle of each pink strip by folding it in half and then pin the middle of the strip to the middle of the top and the other strip to the middle of the bottom of the quilt. Then, while I sew it on, I make sure the ends of the strips meet at the ends of the quilt. I use pins and bobbin tugging to make sure the fabrics (border and quilt) all match up. This will keep your quilt square!

Next step: Measure the length of the quilt, down the middle, including the new top and bottom borders. Cut 2 3" wide strips that exact length. Find the middle of the strips and pin it to the middle of the sides. This helps to sew the border strip to the quilt evenly. Make sure the quilt fits the border length when you sew it on.

Here's a pic of the first, pink border. I added 2 more borders to this quilt before I called it good! More pics of them in the next posting!


Saturday, July 10, 2010

M I A

Sometimes I bite off more than I can chew. I have great ideas and then after a while, I realize that it's not working out, other things crowd my life, just not possible. This blog was full of great intent but life happens and this got shelved for a while.

I'm not ending it, but I am slowing down. I've always been more of a jack-of-all-trades rather than a master of one. So, I got busy with other things. I still will always be making quilts, but I can't plan every project around pictures, cameras, lighting, posting, and self-imposed deadlines. So, please feel free to continue visiting and I will post when I can.

Please don't expect too much from me. My whole life is not quilting, although a lot of it is. Caitlin's quilt has made it to the quilter's who promises 2-3 months on the return. We'll see about that. Maybe I'll start the nagging phone calls ("Is it done yet?") now. I'll post the end of the piecing soon.

Please continue to ask questions, visit to review a how-to, and keep making beautiful quilts!

Monday, April 19, 2010

Time for a Re-Show...

Do you remember this quilt top?

Well, it just got back from the quilter---
I love it even more. It's amazing what quilting can do for your quilt! It brings it to life!


The nubby minkee on the back looks so soft and comforting.

Good job on this quilt, S! It's beautiful!

Monday, April 12, 2010

E's Show and Tell--Auction Quilt

This is a quilt my cousin, E, made. I love the scrappy look it has and it is an ingenious way to use up lots of little scraps! I also love how the quilting and attaching squares is all-in-one (check out the detail picture below)! It's a fantastic way to put a quilt together! Here's her story:

I made this quilt in March for an auction to benefit a family who's baby daughter was diagnosed with Schizencephaly. This is a syndrome where the two sides of the brain don't communicate with each other and can cause a lot of problems including frequent seizures. Baby M has three older sisters, and was traveling hundreds of miles across four states to a clinic to try and help her little body control the terrible seizures she had, leaving her father and sisters at home. Her grandfather organized an auction to try and help with some of the medical bills. I got an email about little M and knew I could do something to help.

I made this quilt entirely from my scrap box. The front and back are old sheets that I've been saving for a really good project. A lot of these colorful scraps were given to me when I very first decided to sew by two amazing women, who the quilt is named for. They are full of strength and faith and love, and if little M and her family can posess any of those qualities I know they will be able to make it through all the medical issues they will be dealing with. This quilt sold at the auction for $95 and I couldn't be more pleased.


E: I'm in love with how you do so much to help others. You hear of someone in need and don't even think twice about doing something to help--you're the first to sign up! You're a great example to all of us! Thanks for sharing!

Monday, April 5, 2010

M's Show and Tell

This quilt belongs to my husband's nephew's wife! Funny how quilting can bring distant relations together! M is an awesome quilter and has a great sense of style! I love this spring quilt and I love how she was persistent until she got it how she wanted it! Wow! What a difference good quilting makes! Here's her story:

This is a quilt I made from a kit sold in a nearby store which I fell in love with. I love the reds in a spring quilt! It's unexpected - but so cute! I also loved that it has a little bit of everything in it - it has pieced blocks, appliqued blocks, even one paper-piecing block (the basket). All of them have embroidery on them which really adds to the sparkle (and learning) - and when I saw it, I just knew I had to make it.
I spent a couple of months putting the top together and was thrilled with it - it was my best work yet and I love it so much. I knew that I didn't want to quilt it myself because I am not experienced enough at that and did NOT want to ruin my favorite quilt, so I took it to a lady who has done several quilt for me "edge to edge" and has done a beautiful job. I asked her if she could customize this one - do special stuff inside the blocks (a shadow effect on the applique blocks, and some fun stuff on the shoefly blocks) - she said she'd done it before and could do that for me but it would cost extra. I was okay with that because this quilt was special to me (for some reason) and I really wanted it done well.

Anyway, here are some pics of the work she did. I was pretty bummed when I got it back (after paying $96.00 for the quilt work!!) - and it was pretty much a horrible quilting job. I don't know much about quilting, but even I could see that this wasn't a good job. I was really depressed for a couple of days, then, I got myself together and got my unpicker out. I unpicked the whole entire thing and then, took it to a "professional quilter" to try again.

Here are more pics of the finished job. It was absolutely beautiful and exactly what I'd hoped for!! (and I only got charged $24.00 for the whole thing!) - I think she felt bad for me.
So, anyway - just finished binding it last week (and I did the curvy edge this time - for extra perfection) - and I LOVE LOVE LOVE it.
It was worth every unpicking moment because I wouldn't have ever been as happy looking at it on the wall if I'd left it like it was.
I guess the moral of this story is be careful who quilts your precious quilts!! Make sure they know what they're doing - pictures would be good as evidence!
Bunny from the first quilter.
Bunny after the second quilter.
First quilter

Second quilter.
Love the yo-yo's and the basket!

Here's the back of the quilt. Well done M!!! Love it!